UNDER CONSTRUCTION
IoT Communications LXC
Once again, I toyed around with the TTeck scripts to get my initial LXCs running for things like MQTT and ZWave. They worked just fine but I wanted to go the DIY route.
After some thought, I decided it was best to dedicate a single LXC to the common IoT communications protocols. Currently, I’m running MQTT with plans to add ZWaveJSUI. There is also room for adding Matter and ZigBee protocols.
Creating the LXC
I started the CT creation wizard and used the following settings:
- General
- Hostname: IoT-Comms
- Password: ‘set a strong password’
- Unprivledged: Check
- Template: Debian 12
- Disk Size: 4 GB
- CPU: 2 Cores
- Memory: 2048 MB
- Static IP chosen
Once the container is created, log into the shell.
Installing Mosquitto
Debian already ships with a version of Mosquitto.
apt install mosquitto
apt install mosquitto-clients
These commands should install the mosquitto client and broker systems that are packaged with Debian and start running them as a service. Check the status.
service mosquitto status
We can send and receive some test topics to verify the installation.
This requires two terminal/console windows to the LXC. I used the GUI console and an SSH session. Depending on the LXC permissions, /etc/ssh/sshd_conifg may need to be edited to allow for access.
In the first console subscribe to a local test topic.
mosquitto_sub -h localhost -t test_topic
In the second console, publish a message to the test topic.
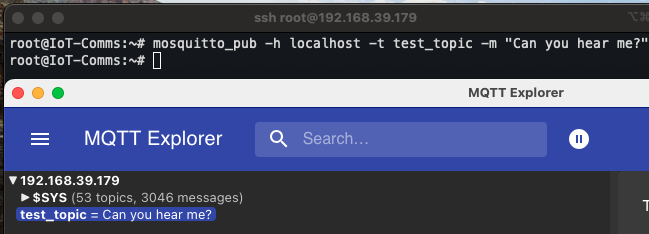
mosquitto_pub -h localhost -t test_topic -m "Can you hear me?"

The published message should appear in the first terminal that was subscribed.
To take full advantage of MQTT, it needs to be exposed to the network. Let’s take a look at securing and exposing the instance.
Exposing Mosquitto
The mosquitto configuration files are stored in /etc/mosquitto. User generated changes to the configs should be loaded into the conf.d directory with a .conf extension.
Create and name a new conf file.
nano /etc/mosquitto/conf.d/access.conf
In this file we will expose mosquitto on port 1883, the default MQTT port. We can also specify a password file and control access.
Since nothing important is on the server an it should be secured behind a local network start by populating the file as follows:
listener 1883
allow_anonymous true
Save the changes and restart the service with system mosquitto restart
Follow the previous steps on publishing a MQTT message. But this time use a client with a different IP to access the server and view the message. I like using MQTT Explorer on my desktop machine.

If anoymous access is sufficent for the use case then feel free to move on. However, I suggeset continuing to securing the instance with at least a password.
Secure Mosquitto
Run the integrated Mosquitto password generation tool to setup a username and password combo. Replace <username> with your desired credentials.
mosquitto_passwd -c /etc/mosquitto/.passwd <username>
Once this pair is generated, return to the previous created conf file.
nano /etc/mosquitto/conf.d/access.conf
Update it to point to the new password file and remove anonymous access.
listener 1883
allow_anonymous false
password_file /etc/mosquitto/.passwd
Restart the mosquitto service. Now a password should be required for authentication to the server. Once again, this can be verified via MQTT Explorer at the desktop and entering the credentials with the connection.
Additional Security
The mosquitto docs contain additional information on authentication methods and certificate security. I feel a password is sufficient for my use case.
ZWaveJSUI
Coming Soon!