UNDER CONSTRUCTION
Frigate LXC
My previous system ran the Frigate Docker container just as the developers intended. I had no issues connecting my cameras or passing through the GPU and USB Coral. I once again used a TTeck script to get my initial Frigate LXC off the ground. Despite using the script, I still needed to work some command line magic to get pass through working properly.
I dove a bit deeper into the script and found that it appears to pull the Frigate project and run it directly on the LXC without the use of Docker. This works but Proxmox already isn’t 100% supported by Frigate and I didn’t like that idea. I ended up building my own LXC the running Docker and Frigate there.
Preparing Storage
I’m not sure this was the best or right way to go about this but it works for me. Depending on the intended storage plan, this step will vary.
Remember how I have a 1 TB SSD in the Proxmox host? That is the drive I plan to use for storing all of my Frigate recordings. The drive was visible on the Proxmox GUI under the Disks tab. I selected the drive, wiped it, then initialized it with GPT per the GUI tools.

Make sure to select the correct drive when doing this. Don’t want to wipe out important or system data by mistake.
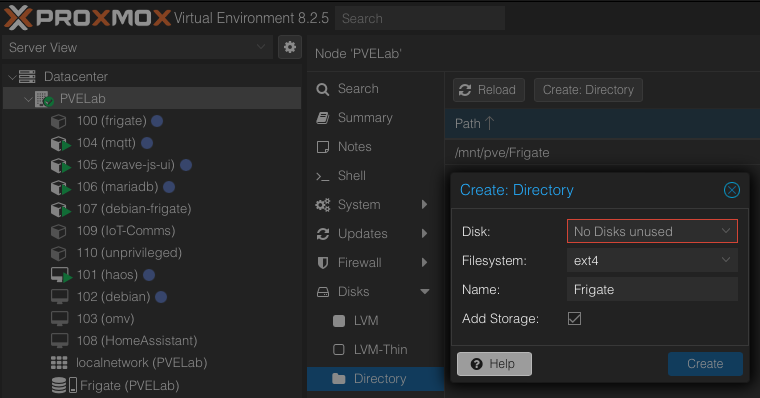
Next, I created directory storage on Proxmox using this newly initialized drive. Select Disks > Directory > Create: Directory. Choose the correct disk and file system, I used ext4, and give it a name.

Once that is complete, the drive should be mounted to the Proxmox host as directory storage.
Build the LXC
Open the Create CT wizard and begin to define the LXC options. Make sure to uncheck “unprivileged container”
This makes the LXC privileged giving it more access to the host system. Its a security trade off for making it easier to pass the GPU and Coral through. I may experiment more with running Frigate unprivileged but I’m not sure its worth it in my environment.
Assign a CT ID, username, and password as normal. I’m using the Debian 12 template saved on my local storage for this LXC.
I’ll talk about the disks and storage in a bit. For now I assigned 4 CPU cores and 2 GB RAM to the container.
I needed to bump up the RAM on my TTeck LXC previously. I figured I would start this one with 2 GB and adjust accordingly.
Disks
With the new directory storage on Proxmox, two storage options will appear. These are likely “local-lvm” and whatever you named the directory storage. I chose to keep my rootfs on the local-lvm storage. I also couldn’t find much in the way of required system specs in the Frigate docs. I kept the disk size at 20 GB but will probably be able to shrink it as no media will be saved here.
You can select Add to add a mount point for the directory storage at this step. Choose the storage location, input the disk size, and define a mount point in the LXC for this drive. I would also uncheck the backup option. Unless you want to back up large amounts of media with this container.

Once everything is defined to your liking start the container.
Configuring The LXC
Start by making sure everything is up to date in the container then install usbutils.
apt update
apt upgrade
apt install usbutils
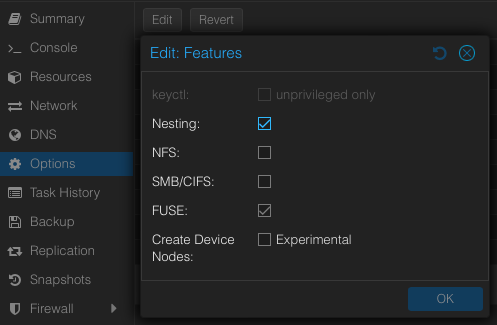
Once that is done, verify the LXC has FUSE and Nesting enabled. Select Options > Features and make sure the boxes are checked. Finally reboot the LXC.

GPU Pass Thru
To pass thru the GPU, open the LXC config file on the Proxmox host.
nano /etc/pve/lxc.<CTID>.conf
Where <CTID> is the ID of this LXC. Per the Frigate docs on a Proxmox install simply add the following lines:
lxc.cgroup2.devices.allow: c 226:128 rwm
lxc.mount.entry: /dev/dri/renderD128 dev/dri/renderD128 none bind,optional,create=file
I’m not 100% sure if some permissions on the host need to be changed in order for this to work. I had used the TTeck script prior and it looks like it changed some permissions in the /dev/dri directory.
Once this is done, restart the LXC or move on to adding the Coral.
Lets dig a little deeper. Running ls -l /dev/dri on the Proxmox host should list the graphics devices connected to our machine. renderD128 is the device were interested in. The first line added to the LXC config supposedly allowed the LXC to use/see the device based on the number mapping and the second line mounts the device in the LXC.
USB Coral Pass Thru
Run lsusb in the LXC to view the USB devices it can see.
lsusb
Look for either a “Google Inc.” device or “Global Unichip Corp.” device. From what I understand, the Coral first shows as “Global Unichip” until it is used, then the ID and name changes to “Google Inc.”
Open the LXC config file on the Proxmox host.
nano /etc/pve/lxc.<CTID>.conf
Where <CTID> is the ID of this LXC and add the following:
lxc.cgroup2.devices.allow: c 189:* rwm
lxc.mount.entry: /dev/bus/usb dev/bus/usb none bind,optional,create=dir
If I understand this correctly, the first line gives the LXC access to the USB devices and the second mounts the bus to the LXC.
This method mounts the entire USB bus to the LXC. It’s not the most elegant or secure but it prevents errors with the bus changing on reboot.
I had problems with the USB bus changing on reboot and the above method was the easiest way to solve this. I’m not sure if this is a hardware limitation or something else that causes it. I attempted other solutions like udev rules but I couldn’t get anything else to work.
Once these changes are made, reboot the LXC.
Installing Docker
Navigate over to the Docker installation instructions and follow the instructions for the LXC distro. Once it is complete, run the hello-world test.
docker run hello-world
The image should download and run, displaying in the console that things are working correctly.

In the event of an error, it is likley due to a nesting issue. Refer to back to Configuring The LXC.
If you’d like, we can continue as root. However, it is better practice to create another user. I felt this was more necessary since I’m also doing this in a privileged LXC.
Run adduser frigate to create a new user with the name “frigate”. Follow the prompts to input a password and set demographics. Then add this new user to the docker group with usermod -aG docker frigate. This allows the user to run docker commands without sudo.
Log into the LXC as the new user and confirm this works.
Installing Frigate
We can now move onto installing Frigate. Create a docker-compose.yaml file with the desired parameters. An starting example can be found in the Frigate docs. It is probably a good idea to expose port 5000 for troubleshooting.
Exposing port 5000 opens the unauthenticated admin interface of Frigate. It should be access limited during production.
My installation passes the USB Coral and the initial hardware acceleration parameters as specified in the example compose file. Be sure to update the /path/to/your/config parameter to the location of the frigate.yaml file in the LXC. Check out the Frigate docs regarding building a configuration file.
Remember the mount point we defined when we built this LXC? That is what goes in the /path/to/your/storage parameter. Now is a good time to set up a storage plan if you haven’t already.
Use docker compose up to start the container and watch for any errors in the run logs. If the container starts and port 5000 was exposed in the compose file, then the Frigate admin interface can be accessed using the LXC’s IP at port 5000.
Confirming Pass Thru Settings
Unless hardware acceleration and detectors have already been defined in the Frigate config, some warnings should show up in the logs regarding them not being recommended. As long as the pass thru steps were followed during the LXC creation, we should only have to add relevant configuration.
GPU Hardware Acceleration
Starting with GPU hardware acceleration, open frigate.yaml and add:
ffmpeg:
  hwaccel_args: preset-vaapi
For the AMD GPU in my machine, the LIBVA_DRIVER_NAME: "radeonsi" environmental variable must be passed in Docker.
More information is available in the Hardware Acceleration section of the Frigate docs.

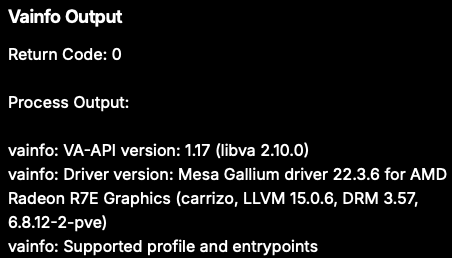
If on a restart of Frigate, the hardware acceleration is working correctly, then no log warnings should be listed. You should also be able to see some GPU information in the System metrics > Hardware info pane.
There are a few programs that allow GPU use to be monitored. Since I have an AMD Radeon GPU, I installed radeontop, apt install radeontop, on the Proxmox host. I ran it once with the Frigate LXC on and again with it shutdown to ensure it was using the GPU.


GPU use with Frigate LXC running. GPU use without Frigate LXC running.
Coral Detection
To add object detection with a USB Coral, the following needs to be added to frigate.yaml:
detectors:
  coral:
    type: edgetpu
    device: usb
Once again, more information on other detectors can be found in the Frigate docs.
Restart Frigate after this has been added and monitor the logs during boot. If an error appears, something is wrong and the system will bootloop.

Review the config and pass thru settings. Double check the USB bus mappings.
As long as the device was passed correctly, the system will start up and the logs will find the detector.

Additionally, the System metrics pane will show the detector listed as coral rather than CPU.

Next Steps
With Frigate up and running, we can move on to adding cameras, tweaking the configuration, and integrating it with other programs. Stay tuned for how I configured my Frigate instance.