Samba Shares
Table of contents
SMB or Samba is a protocol that allows for easy file sharing across the network. Lets share one of the newly created folders over the network. First, make sure you’ve created a user and group to access this share. The admin and root users are not only restricted from accessing SMB shares, but it’s poor security practice to use them for this purpose. Then enable the SMB service in OMV. Navigate to Services > SMB/CIFS > Settings and check the Enabled box.

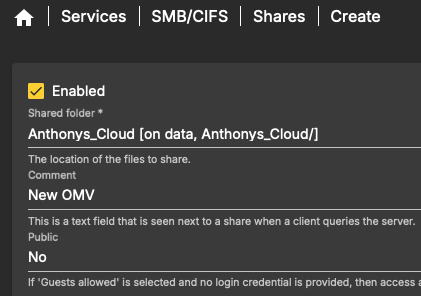
Once SMB is enabled, click Shares followed by the plus icon to create a share. From this wizard, we can enable sharing of this folder, select the shared folder to advertise, add comments, and set some additional security parameters. Once the share is created, it will show up in the GUI.
Accessing SMB Share (MacOS)

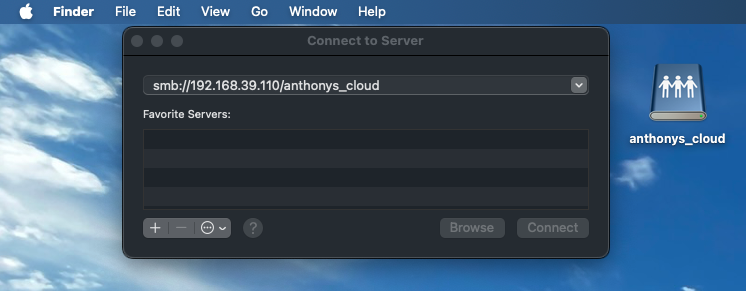
To access a SMB share on a MacOS workstation use the Finder menu bar following Finder > Go > Connect to Server.... Enter the path to the SMB share in the format smb://ip.of.omv/shared_folder_name. You should already know the IP address of the OMV server. The shared_folder_name is found in OMV under the Services > SMB/CIFS > Share tab. If done properly, you’ll be asked to enter credentials and the share will mount.
Mount SMB Share on Boot

We can use Apple’s “Script Editor” program along with setting a startup application so our SMB shares mount on boot of the machine. Fire up the script editor and enter the following script:
tell application "Finder"
	try
		mount volume "smb://username:password@ip.of.omv/shared_folder_name"
	end try
end tell
Be sure to use the username and password of the user that will access the share along with the correct IP and name of the share. This script is pretty human readable. It simply tells Finder to try and mount the specified volume using the supplied credentials. The play icon in the editor with run the script. Assuming the share is not mounted and all the syntax is correct, pressing it should mount the share.
The credentials are stored in plain text. Anyone with access to this machine may be able to view them.
Now that our script is working, we need to convert it into an application to run at boot. From the editor, select File > Export... give the script a name, change the format to Application and save it. Congratulations, you’ve officially written an application for MacOS. We can run the application by double clicking it and again, it should mount our share.
The last step is to run this application at startup. In the Mac Settings under General > Login Items & Extensions we just need to add this application as an item to open at login. That’s it. The final test is to reboot your machine and watch the share automatically appear on the desktop.
Avahi/Bonjour
I’d like to figure out how to get my shares to show up with a pretty name and icon in Finder rather than just by IP address. This isn’t critical so I’m leaving this section open as a work in progress.